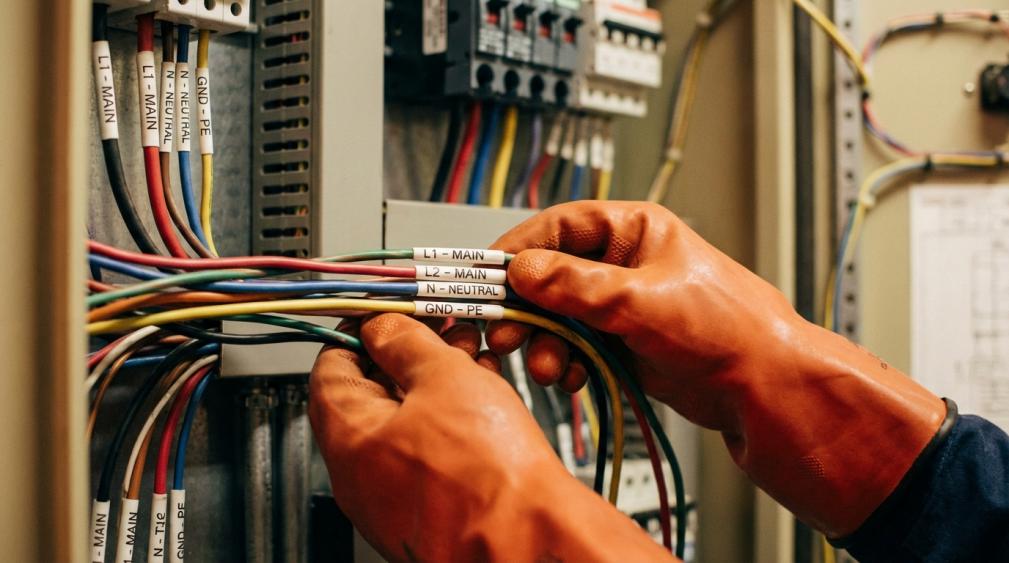

Labeling every wire in your lithium retrofit or off-grid system turns a fragile science project into a safe, serviceable power system you can live with and confidently maintain.
You open the power cabinet after something trips and see a tangle of red and black conductors, unsure which one feeds the refrigerator and which one could arc if you touch it. In every upgrade where wires were labeled from day one, fault finding later dropped from long, stressful afternoons to quick, controlled checks with far fewer mistakes. This guide explains why beginners should label every single wire and how to do it so your upgraded power system stays safe, easy to service, and ready to grow.
Why Labeling Is Non-Negotiable in Lithium and Off-Grid Builds
When you convert an older cabin, RV, or boat to lithium storage, you add more components, more conductors, and more energy than the original designer ever imagined. Consistent tags on every wire are not cosmetic; they are a basic safety control that reduces confusion, maintenance time, and mistakes across everything from small panels to complex control cabinets, which is why manufacturers describe labeling wiring as a foundational practice for any electrical system. Clear, durable markings on wires, cables, and panel circuits are also treated as a requirement in many electrical standards, not a nice-to-have, because they make it possible to install, maintain, and expand systems without guesswork, as experts in electrical panel organization explain.
In an off-grid system, you do not have a facilities team on call; you are the one who has to kill the right circuit in the dark, often in bad weather, and bring it back safely. Labeling every wire on day one is the cheapest insurance you can buy against that future crisis.

Safety: Being Able to Kill the Right Circuit in Seconds
The first job of a label is safety. A panel that clearly shows which breaker feeds which room, outlet, or appliance lets you shut off only the circuit you need instead of blindly flipping switches during an electrical smell, a sparking outlet, or a flooded basement, as guidance on labeling your electrical panel emphasizes. Residential panel specialists warn that unlabeled or vaguely labeled breakers increase the chance of leaving a dangerous circuit energized or accidentally dropping power to critical loads like refrigerators or medical gear, which echoes broader safety advice that well-marked panels are central to rapid emergency response in breaker labeling discussions.
On the DC side of a lithium system, the same principle applies to battery strings, charge controllers, and combiner boxes. Industrial labeling vendors treat clear identification of each conductor’s function and voltage as a primary safeguard against shock, equipment damage, and fire, and they position proper wire, cable, and control panel marking as a foundation for safe lockout and tagout procedures. In practice, that means a wire feeding a lithium charger should never look identical to a low-voltage sensor unless the label on each leaves no doubt.
Imagine a ground fault on a rainy night. If every conductor is tagged with its origin, destination, and purpose, you can open the panel, isolate the exact circuit, and shut it down without touching anything else. Without those tags, you may be forced to test and disconnect wires in a live environment just to figure out what is what, which is exactly the scenario safety standards try to eliminate.

Speed and Sanity: Troubleshooting Without Tearing Your System Apart
Labeling is also about not wasting your weekends chasing hidden problems. Wire-marking guides point out that unlabeled or misidentified conductors force technicians to trace cables manually through bundles and conduit, dramatically extending troubleshooting time and making errors more likely. Cable-management experts note that organized, labeled systems let you identify a problem cable at a glance instead of in an hour, and proper cable labeling guidelines emphasize clear, human-readable IDs that match your documentation.
In a lithium retrofit or off-grid build, every unplanned outage costs you more than time. A mislabeled inverter feed can dump your entire battery bank accidentally, or a guessed-at solar string can leave you wondering why production is low for weeks. When each conductor is labeled at both ends, you can isolate sections quickly, test them systematically, and restore service without tearing apart walls, raceways, or battery compartments.
Even a simple mental calculation shows why this matters.

If labeling saves only a few minutes each time you need to reset, test, or move a circuit, and you do that work dozens of times over the system’s life, you recover hours of troubleshooting time and avoid a long list of preventable mistakes.
Reliability, Compliance, and Long-Term Value
Good labels do more than get you out of trouble today; they protect the system over its lifetime. Panel-labeling experts stress that the directory on the inside of a panel door should be specific, accurate, and permanent, in line with code expectations that functions be clearly described instead of vaguely called “lights” or “plugs,” a point emphasized in resources on electrical panel organization. Wire-label manufacturers also highlight that durable identification supports inspections, reduces legal risk, and helps demonstrate that you have taken reasonable steps to maintain a safe workplace, a concern that extends directly to home workshops and small off-grid facilities in guidance about electrical wire labels.
From a reliability perspective, clear labels mean that future repairs or upgrades are less likely to introduce new faults. When you or a hired electrician can see immediately which conductors carry power, which carry control signals, and which are low-voltage monitoring lines, the chance of an accidental cross-connection drops sharply. Good labeling also makes it easier to document the system for resale; a buyer who opens a neat, clearly tagged power cabinet will trust the build more than one that looks improvised.
What "Label Every Single Wire" Actually Means
Beginners often think labeling means scribbling “battery” on one or two big cables and calling it done. In professional practice, labeling wiring means clearly identifying every wire and cable with readable tags so they can be distinguished quickly, reducing confusion, mistakes, and downtime across the system, a definition echoed in industry articles on labeling wiring. Several best-practice guides recommend that each wire label include at least where the conductor comes from, where it goes, and what it does, a pattern that aligns with cable-plant schemes where IDs encode useful information such as type and termination points as described in cable labeling guidelines.
In a lithium or off-grid context, a single tag might read "PV1+ roof south string to combiner input 1" or "Battery bank negative to shunt," rather than a vague "solar" or "battery." Applying this discipline to every conductor, even short jumpers inside a combiner or battery cabinet, is what turns a random collection of parts into a coherent system you can understand at a glance.
What Goes on the Tag
At a minimum, every tag in your system should spell out three things in plain shorthand. First is the origin, meaning the device or terminal the wire starts from. Second is the destination, the exact point it lands on. Third is the function, such as "charge input," "inverter output," or "temperature sensor." Wire-marking references emphasize that labels should also indicate when a conductor carries higher voltage or current so that anyone opening the panel can distinguish power feeds from low-energy control lines, a pattern seen in both industrial and panel-organization guidance.
You should also keep the text short but clear. Industry advice for wire markers and cable tags points toward large, legible characters that can be read without twisting the conductor, and notes that printed tags are usually easier to read and more consistent than handwritten ones, a conclusion reinforced in articles about marking your cables.
Where to Put Labels in an Off-Grid System
Good practice is to label both ends of every wire and place the tag close to the termination where you can see it without moving the conductor. Structured-cabling standards and cable-plant guidelines repeatedly stress that cables should be labeled at both terminations, with IDs placed near connectors so technicians can match physical lines to documentation quickly, an approach that underpins proper cable labeling guidelines. For longer runs through walls, conduits, or underground raceways, many cable-management references recommend adding mid-span tags at junctions or pull points so you can confirm which cable you have without pulling it completely free.
In a lithium retrofit, that might mean a tag at the combiner box and another at the roof penetration for each solar string, plus tags at both the battery and the inverter for every large DC cable. It also means labeling short internal jumpers between breakers, shunts, and busbars so that the next time you open the cabinet, you know at a glance how power flows.
Choosing Label Types and Materials That Survive Your Environment
Not every label is created equal. Cable-management and printing vendors emphasize that you should always match label type and material to the environment so that identification remains legible despite heat, moisture, oil, or sunlight, a point repeated in both marking your cables and in industrial discussions of professional wire printing, labelling and identification. Long-term reliability guidance also recommends durable, high-contrast labels that resist fading and abrasion, especially in harsh environments, which is why panel-labeling resources stress investing in permanent, fade-resistant materials in electrical panel organization.
For off-grid and lithium systems, that typically points toward heat-shrink sleeves, self-laminating wraps, or rugged cable tags rather than ordinary office stickers. Outdoor or exposed runs benefit from UV-resistant tags designed for aggressive environments, such as polyolefin cable markers tested from -40°F to 220°F in products like cable tags.
Label type |
Strengths |
Weak points |
Off-grid example |
Self-adhesive wrap |
Quick to apply, inexpensive, good for small indoor harnesses; self-laminating versions protect print from wear as described in marking your cables. |
Adhesive can peel in hot, oily, or damp environments if not matched to conditions. |
Labeling short control wires inside an indoor inverter or DC distribution panel. |
Heat-shrink sleeve |
Extremely durable, resists abrasion and many chemicals, stays put for the life of the wire; widely recommended for demanding applications in wire marking and professional wire printing. |
Must be installed before termination and shrunk with heat; not ideal for wires you cannot disconnect. |
Tagging large DC cables between lithium batteries, shunts, and inverters where reliability matters most. |
Rigid or flexible cable tag |
Very visible, can include more text or symbols, available in UV-resistant plastics for harsh weather as shown by outdoor-rated cable tags. |
Bulkier than sleeves, can snag if overcrowded, usually tied or clipped on. |
Marking exposed solar homeruns or outdoor combiner feeds along exterior walls or array frames. |
Panel directory and device labels |
Provide a complete map of circuits and key equipment data in one place, required to be legible and specific in electrical panel organization and complemented by equipment labels like those in electrical wire labels. |
Only as good as their accuracy; must be updated with every change to avoid dangerous confusion. |
Circuit schedule on the inside of the main DC or AC panel door, plus nameplates on inverters, charge controllers, and disconnects. |
For beginners, the practical takeaway is simple. Use self-laminating wraps or heat-shrink sleeves inside enclosures, and use rugged tags or UV-resistant wraps outdoors. Whatever you choose, make sure it is sold specifically for wire and cable and rated for the environment where it will live, not just whatever office label roll happens to be nearby.

A Simple Labeling Workflow Beginners Can Trust
The most important rule is to label as you go, not later. Labeling references for both industrial equipment and structured cabling show that installations run faster and with fewer errors when labeling is integrated into the build sequence rather than bolted on at the end, a pattern also noted when planning cable labeling guidelines. In practical terms, that means planning your naming scheme, printing or preparing a batch of labels, and applying each tag immediately after you cut and terminate a wire.
Start by sketching your system: batteries, switches, busbars, charge controllers, inverter, main loads, and key sensors. Decide on a clear, human-readable pattern that combines source, destination, and function, such as "B1-INV+ main positive" or "PV-SOUTH-1 to combiner 1." Then, as you install each conductor, write or print the matching label and attach it to both ends before moving on. Cable-management experts strongly recommend maintaining a simple circuit or cable map that ties those IDs to physical locations and devices so your labels line up with your documentation over time, which is exactly how proper cable labeling guidelines keep large networks manageable.
Finally, treat your labels as living assets. Whenever you move a load, add a new breaker, swap a charge controller, or reconfigure the battery bank, update both the tags and the directories. Panel-labeling and wiring guides emphasize that outdated or incorrect labels can be worse than none at all because they create a false sense of security, a warning repeated in both electrical panel organization and labeling your electrical panel.
Common Beginner Mistakes That Cause Pain Later
One common mistake is labeling "just the important wires." In reality, it is often the small control or sensing conductors that bring a system down, and they look nearly identical when bundled. Industry experience shows that treating proper marking as an essential investment across all wires improves both safety and efficiency, which is why professional systems frame proper wire, cable, and control panel marking as "foundational" rather than optional.
Another trap is relying on improvised materials such as ordinary tape with fading ink. Label and tag manufacturers consistently warn that improvised solutions smear, peel, or fall off, especially around heat and vibration, which defeats the whole purpose of labeling, a point underscored in resources on marking your cables. Using purpose-built electrical wire labels with durable inks and adhesives is recommended precisely because they stay legible when exposed to temperature swings, chemicals, and physical handling, matching the expectations for electrical wire labels.
A final mistake is assuming you will "remember" what you did. That may be true for a week or a month; it is not true two years later when you open the box after a long winter or when someone else has to service the system. Clear tags ensure that anyone, including your future self, can understand the layout without relying on memory.
FAQ
Do you really need to label both ends of a wire?
If you want to be able to troubleshoot quickly, the answer is yes. Cabling standards and labeling guides consistently recommend marking cables at both terminations so that technicians can identify and trace them without tugging or tone-tracing, an approach reflected in proper cable labeling guidelines. In an off-grid build, labeling just one end leaves you guessing whenever you work at the other, which defeats much of the value you paid for when you bought labels in the first place.
Is hand-writing labels acceptable, or should you use a printer?
Handwritten labels are far better than no labels at all, provided the writing is clear, permanent, and on suitable material. Many practitioners still prefer printed labels because they are more legible in tight panels and can be standardized easily across a project, a benefit highlighted in discussions of marking your cables and in professional wire printing and labeling. For a first build, a fine-tip permanent marker on high-quality self-laminating wire labels is a practical compromise, and you can always move to a dedicated printer as your projects grow.
How does all this apply to pre-labeled cable jackets like NM or UF cable?
Many cables already carry printed information such as gauge, conductor count, and voltage rating along the outer jacket, as explained in residential wiring resources on electrical wire labeling. Those markings are critical for choosing the right cable for a job, but they do not tell you which end goes to which device or what that particular run does in your system. You should still add your own wire labels at both ends to capture origin, destination, and function so your off-grid layout remains understandable at the human level.
Closing
A lithium retrofit or off-grid power system has one job: deliver reliable, safe energy when everything around you is dark or quiet. Tagging every single wire with clear, durable labels is the simplest way to make sure that, years from now, you can open any panel, shut off any circuit, and upgrade any component without fear or guesswork. Build that discipline into your wiring today, and your future self will thank you every time the lights come back on with one confident click.