


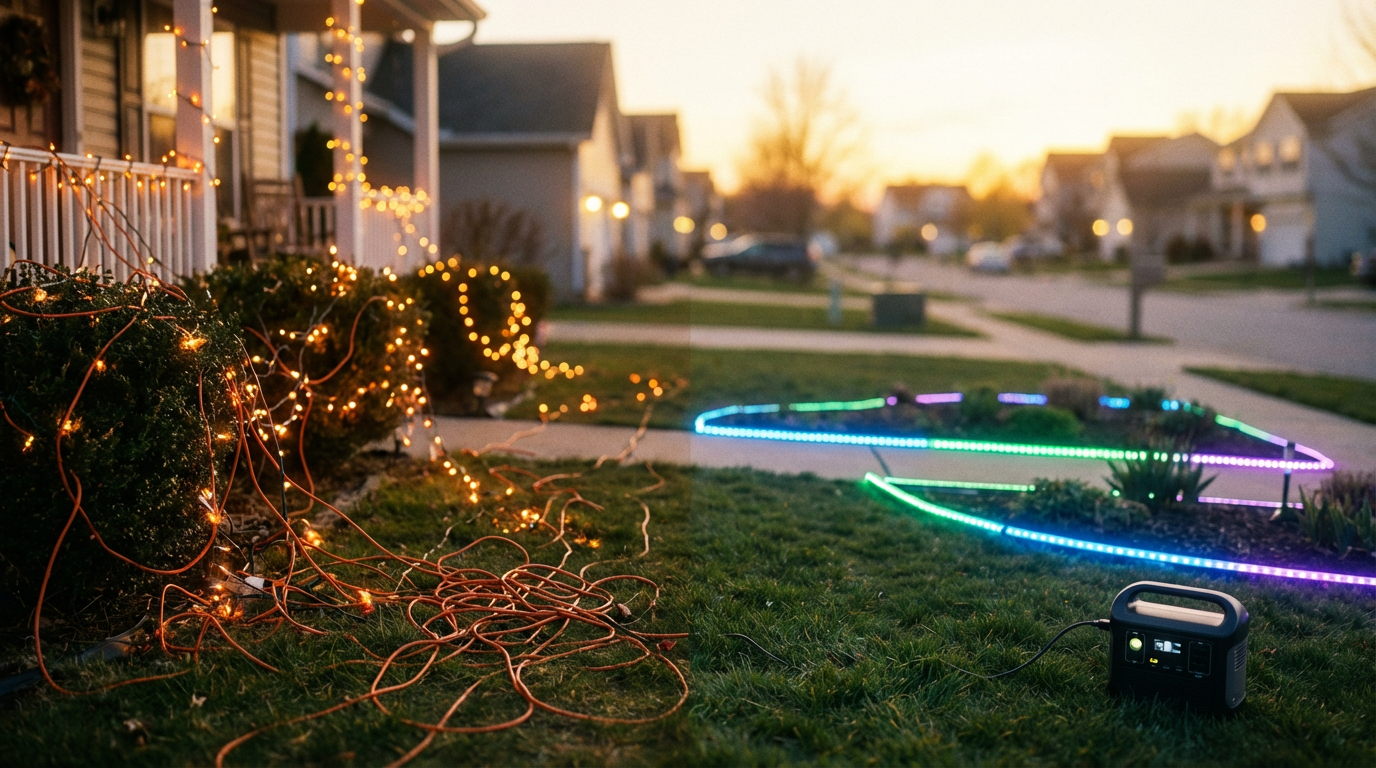
Picture stepping into your yard in the dark, tripping over wet extension cords while breakers keep clicking off every time the display hits full sparkle. Modern LEDs and high-capacity lithium batteries now make it realistic to run a dense, 5,000-LED front yard show from a single portable pack instead of a maze of cords and overloaded circuits. This guide walks through how to size the LEDs and the battery, pick the right voltage, and build a safe, weather-ready setup that turns your yard into a clean, cordless light show. The same principles for calculating amp-hour needs apply whether you're powering bug zappers or thousands of holiday LEDs.
Why One Battery Beats a Tangle of Extension Cords
A typical 15-amp, 120-volt household circuit only has about 1,440 watts of recommended continuous capacity once you apply the 80% safety rule for long-running loads, and every extra outlet, fan, and appliance on that breaker eats into the lighting budget you thought you had for decorations. That 1,440-watt planning number comes from basic circuit math and is highlighted in LED planning guidance such as 15‑amp, 120‑volt circuit only has about 1,440 watts. When you start hanging thousands of LEDs and daisy-chaining cords across the yard, you are not only flirting with that limit, you are doing it in the worst conditions: moisture, long cord runs, and lots of trip hazards.
Battery-powered LED lighting flips the problem. Instead of pushing more and more current through long 120-volt cords, you bring a single, compact power source out to the yard and distribute low-voltage wiring from that hub. LED strip and pixel projects are routinely run this way for mobile rigs and temporary setups because the combination of efficient LEDs and well-sized batteries is both portable and surprisingly robust. Battery-powered LED strip lights are a flexible, energy-efficient option where outlets are unavailable. The result is a quieter power profile indoors, a cleaner yard outdoors, and far fewer surprises when the weather or the crowd shows up.
This approach is already standard for mobile LED builds on bikes, clothing, stage costumes, and temporary light panels, where wall power is either impractical or unsafe. In those designs, battery-powered LED strips let you create dense, cable-free lighting layouts while still using familiar dimmers, controllers, and color effects. You can power LED strip lighting from batteries to create portable, cable-free setups. A front yard retrofit simply scales that logic up and adds weatherproofing and runtime planning.

Step 1: Know What 5,000 LEDs Really Draw
Before you can talk about "one battery," you need to know what you are asking that battery to do. LED makers give you the key clues on their spec sheets: voltage, wattage, and sometimes per-pixel current.
For individually addressable RGB pixels, a common worst-case figure is that a single pixel at 5 volts, blasting full-brightness white (all three color channels at maximum), can draw up to about 60 milliamps one pixel at full-brightness white can draw up. A 60-pixel strip at that intensity can therefore pull around 3.5–3.6 amps, which adds up fast as you extend runs. If you naively ran 5,000 such pixels all at full white, the theoretical current would be enormous, which is why serious displays use brightness limits, color palettes, and animation patterns that keep the average draw far below the absolute maximum.
Strip-style lights and prebuilt 12-volt string sets often publish power consumption directly in watts, which makes planning simpler. LED strip system guides emphasize that strip power is rated in watts, battery capacity in amp-hours, and that runtime is essentially your battery watt-hours divided by the strip's wattage battery watt-hours divided by LED strip wattage gives an approximate runtime. That means your first job is to total up the actual wattage printed on each box of lights, not just count bulbs.
As a concrete example, some 16.4-foot 12-volt strips draw on the order of 21 watts, and battery-planning examples use that figure to show how different packs affect runtime. Four such strips already land you near 85 watts. If your 5,000-LED yard is composed of multiple strings or strips with similar ratings, you can quickly estimate whether you are in the 50-watt range, the 100-watt range, or something larger.
Theory is useful, but measurement is better. Practical LED battery guides strongly recommend using a multimeter or inexpensive power meter to measure real current draw for your specific animations and brightness settings, then basing runtime calculations on those numbers rather than worst-case tables. If your "full sparkle" mode draws 6 amps at 12 volts (72 watts) and your calmer patterns sit around 3 amps (36 watts), you can design your battery system to comfortably handle the peaks while sizing runtime around the average.
Step 2: Size the Battery for Cordless Runtime
Once you know roughly how many watts your 5,000 LEDs need, the battery math becomes straightforward. LED battery sizing guides boil it down to a simple relationship: battery capacity in amp-hours is approximately the LED power in watts multiplied by the desired runtime in hours, divided by the battery voltage in volts battery capacity in amp-hours is approximately LED power. This gives you the ideal number before safety margins.
Another way to see the same idea is to think in watt-hours: your battery's watt-hours are its amp-hours multiplied by its voltage, and runtime in hours is those watt-hours divided by your LED load in watts. LED strip battery articles use this to show that a 3.5 amp-hour 12-volt battery (about 42 watt-hours) will run a 21-watt strip for just under 2 hours, while a 20 amp-hour pack (about 240 watt-hours) will run the same strip for over 11 hours battery watt-hours divided by strip wattage gives practical. The same math scales cleanly to your entire yard display.
Real batteries never deliver their full theoretical capacity, especially at higher currents, so professional advice is to add a safety factor. LED battery calculators and technical runtime guides commonly suggest multiplying the ideal amp-hour value by around 1.2–1.5 to account for conversion losses, aging, and the fact that many chemistries should not be fully discharged; a safety factor of about 1.2–1.5× is commonly recommended. General battery-runtime articles for lithium packs echo this, recommending that you derate simple amp-hour divided by current calculations by about 10–20% for more realistic results lithium battery runtime estimates are typically reduced by.
In practice, this looks like the following. Suppose you discipline your 5,000-LED yard so that even your brightest scenes average around 100 watts at 12 volts. If you want 4 hours of show time, the ideal capacity is (100 watts × 4 hours) ÷ 12 volts ≈ 33 amp-hours. Applying a 1.3 safety factor to allow for efficiency and to avoid deep discharging pushes the target to roughly 43 amp-hours. That is in the territory of a mid-sized 12-volt lithium pack rather than a tiny power bank, but it is still only one battery box sitting in a corner of the yard.
Large-system examples reinforce how workable this is. One lithium runtime example uses a 12-volt, 60 amp-hour pack feeding a 100-watt load and shows a practical runtime of around 6.5 hours once conversion efficiency is included, demonstrating that a 12 V 60 Ah lithium pack can support a substantial seasonal display. That is the same order of magnitude you need for a 5,000-LED front yard show that runs a few hours each evening, and it uses technology that is now common in off-grid and backup-power systems.

Smaller portable packs are perfect for subsets of the display. A rechargeable 12-volt LED battery pack built from seven 3,200 mAh cells in series, for example, can store about 82.88 watt-hours and provide both 24-volt and regulated 12-volt outputs for strip lighting and controllers. On a 25-watt accent section such a pack gives you a comfortable few hours; for the full yard you either move to a higher-capacity lithium pack or step up to a deep-cycle unit in the 40–60 amp-hour class.
Choosing the Right Lithium Chemistry
For a front yard installation that needs to be relatively light, rechargeable, and long-lived, lithium-based batteries are the natural choice. LED battery selection guides point out that lithium chemistries such as lithium nickel manganese cobalt (NMC) and lithium iron phosphate (LiFePO4) offer high energy density, low weight, and good cycle life, which is why they dominate portable and industrial LED lighting. Compared with alkaline or nickel-based rechargeables, lithium packs store far more watt-hours in the same physical volume.
Lithium-ion specifically stands out for its combination of energy density and rechargeability. Historical summaries note that lithium-ion cells became the standard for high-demand portable electronics because they deliver more energy per pound than many primary lithium batteries and can endure hundreds to thousands of charge cycles when treated well. For your yard, that translates into a single compact case that can quietly power your display season after season, rather than a pile of disposable cells.
To keep those advantages, you need to respect the chemistry. Lithium-ion care recommendations emphasize avoiding repeated full 0–100% cycles and deep discharges, keeping state of charge roughly between 20% and 80% when possible, and keeping packs cool and dry to extend life. LED battery-engineering guides add that lithium packs should be paired with appropriate battery management systems, protection circuits, and chargers that prevent overcharging and overdischarging, both for pack health and safety; proper chargers, BMS, and protection circuits are essential.
Step 3: Match Voltage and Wiring to Your Display
Your 5,000-LED plan has two major electrical choices: the system voltage and the wiring topology.
LED strip and battery-power articles hammer home a simple rule: the battery's output voltage must match the LED product's rated input voltage, whether that is 5 volts for pixels, 12 volts for common strips, or 24 volts for long professional runs. Battery output voltage should match the LED strip or fixture rating, such as 12 V strips on 12 V packs. Trying to run 24-volt strips from a 12-volt pack or vice versa is a recipe for dim, unstable, or damaged lights unless you add proper converters.
When you have the luxury of choosing, 24-volt systems are often better for large front yard layouts because they deliver the same wattage at half the current, which reduces voltage drop, heat, and conductor size across long runs. LED strip voltage comparisons point out that 24-volt strips are typically favored in big rooms, long outdoor runs, and remodels where large continuous runs and higher brightness are needed, while 12-volt strips are perfectly adequate and cost-effective for shorter runs and places where 12-volt power is already available. A big yard display often combines both: 24-volt strips for long rooflines and fence runs, and 12-volt elements for localized props.
Here is a compact comparison that can help you decide:
System |
Best use |
Pros |
Tradeoffs |
12 V |
Shorter runs, existing 12 V gear |
Widely available, lower upfront cost, compatible with many automotive and landscape products |
Higher current for the same power, more voltage drop on long runs |
24 V |
Long frontages, high-density or very bright sections |
Lower current, longer allowable strip runs, more even brightness over distance |
Slightly higher supply cost, requires 24 V-compatible LEDs |
For wiring, remember that LEDs themselves are current-driven devices and need either resistors or constant-current drivers, which is why reputable LED modules and strips integrate those components rather than exposing bare diodes. Electronics design guidance stresses that running LEDs directly from a battery without a current-limiting resistor risks overcurrent and premature failure, and that if you must use parallel LED strings, each string should have its own resistor to ensure balanced current LED strings should include appropriate current limiting, and. For a yard-scale project, that usually means buying finished strings and strips designed for 12 or 24 volts and treating them as modules rather than hand-wiring individual diodes.
On the battery side, good practice is to avoid soldering directly to cells and instead use purpose-built battery holders or packs with proper terminals and wiring. Hobbyist discussions about powering LEDs from AA cells stress that soldering to loose batteries can damage them and create safety risks, and recommend inexpensive holders, parallel wiring of holders for more current, and proper series resistors for LEDs instead using AA holders instead of soldering to cells. Commercial LED battery packs typically provide standard barrel connectors and splitters for exactly this reason, so you can plug in strips and controllers without improvising unsafe joints; LED battery packs for strip lights often include these connectors out of the box.
Finally, do not forget runtime optimization. High-pixel-count LED projects show that although each pixel can draw up to 60 milliamps in theory, real animations rarely hit that level; most patterns run closer to one-third of the maximum because not all pixels are full-brightness white at once, and actual LED pixel animations often draw around one-third of the theoretical peak. Combined with brightness control and smart color choices, that means your 5,000-LED show can look spectacular while still behaving like a modest 50–150 watt load to the battery rather than a monster.
Step 4: Weatherproofing, Safety, and Night-Of Reliability
Running your yard on one high-capacity lithium pack does not just shift the power source; it also changes your safety profile. Lithium LED battery guides emphasize that batteries must be kept in cool, dry conditions, labeled clearly, and protected from physical damage, with appropriate fire-resistant enclosures for larger packs and adherence to relevant safety codes and best practices. For an outdoor display, that translates into placing the pack in a weather-resistant box off the ground, routing low-voltage cables through grommets, and ensuring ventilation so the pack does not overheat under sustained load.
Lithium-ion safety guidance adds that if a battery ever shows signs of swelling, unusual heat, or rapidly shrinking capacity, it should be retired rather than pushed through another season; signs like swelling, excessive heat, and rapidly shrinking capacity indicate a lithium-ion battery should be replaced for safety. Many LED-specific battery packs explicitly warn against exposure to water or fire and rely on integrated protection circuits to cut off power if something goes wrong. Portable LED strip battery packs include warnings against misuse for exactly this reason. Treat those warnings as design constraints for your enclosure and cable routing, not small print.
Well before you invite anyone over to admire the show, do a full-dress rehearsal. Battery runtime articles for LEDs recommend testing with real patterns and measuring the current so that your spreadsheet assumptions match reality, then recomputing runtime with those measured values; measuring current in realistic LED patterns and recomputing makes your estimates much more accurate. Combined with derated runtime formulas that account for efficiency, this lets you predict whether your pack will comfortably cover a 3-hour window or whether you need either a bigger battery or a more efficient animation profile.

When everything is dialed in, the payoff is big. All the hazardous, trip-prone 120-volt cords vanish, replaced by a single robust battery box and low-voltage cabling that you can bury in mulch or clip along trim. Indoors, your panel sees no extra stress beyond a charger topping off the pack between shows. Outside, your guests see a clean, bright, fully choreographed 5,000-LED front yard that feels more like a professional off-grid installation than a stack of holiday extension cords.
Light it once, power it right, and your "one battery" yard upgrade becomes less of a stunt and more of a repeatable template. Plan your wattage, pick a solid lithium pack, match voltages and wiring carefully, and you will turn extension-cord chaos into a clean, resilient lighting system that is ready for every season's show.


Leave a comment
This site is protected by hCaptcha and the hCaptcha Privacy Policy and Terms of Service apply.