


Learn how to turn even a tiny kayak hatch into a safe, balanced power bay that keeps your electronics running all day without ruining how the boat paddles.
You know the feeling: the bite turns on, the wind picks up, you are miles from the launch, and the fish finder or camera dies just when you need it. Paddlers routinely cram multi-day camping loads into slender sea kayaks by refining how they use every inch of hatch space, proving that a small boat can carry far more than it looks. Use that same mindset and you can turn even a modest hatch into a compact power bay without wrecking handling, safety, or your day on the water.
Understand What Your Hatch Can (And Cannot) Do
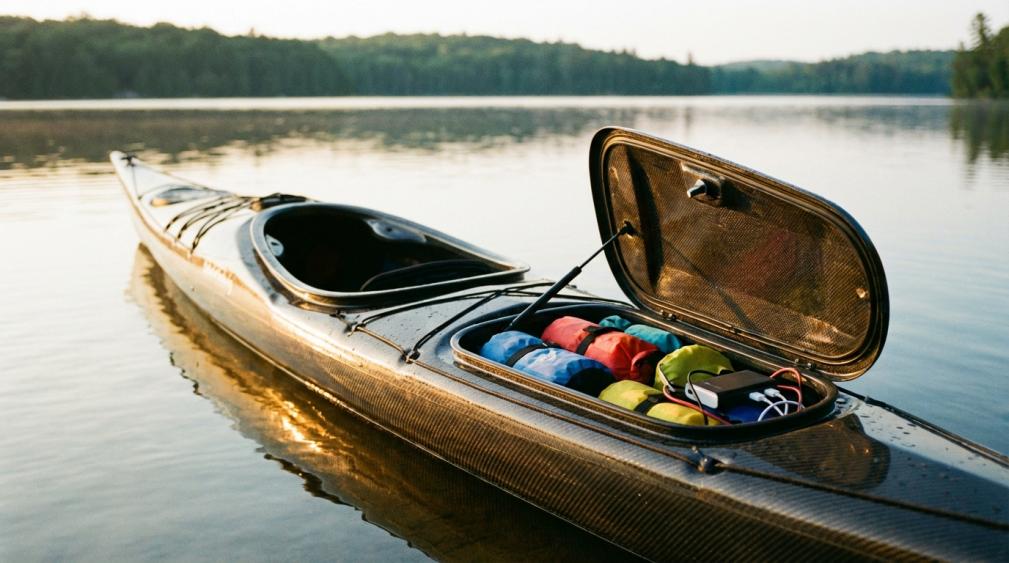
A hatch is not just a convenient hole in the deck; it opens into a sealed compartment in the hull that is designed to keep gear dry while trapping air for buoyancy and easier recovery if you capsize. That sealed storage-and-flotation role is why treating your hatch as a dedicated, orderly bay instead of a junk drawer is so important for any power upgrade. In many touring boats, internal bulkheads create separate chambers so the kayak will not swamp if the cockpit fills, yet those same chambers double as prime storage for gear that absolutely must stay dry. Brooklyn Kayak Company explains that well-designed hatches and careful sealing are essential to that balance.
Not every kayak leaves the factory with a practical hatch cover that lets you reach into that hollow hull. When there is unused space under the deck, cutting in an aftermarket hatch can unlock a perfect spot for a power kit, but you cannot just grab a hole saw and hope. Experienced builders recommend using a flat section near the bow or stern, measuring repeatedly before cutting, following the hardware maker’s instructions closely, and even asking a local shop to do the install if you are not comfortable drilling into the boat. That “measure twice, cut once” discipline is the difference between gaining a clean, dry bay and creating a permanent leak path right where you wanted your battery and wires to live.
Right-Size Your Power Ambition to Your Hull
The fastest way to ruin both a kayak and a power system is to start with the battery size you want and then try to make the boat submit. Experienced paddle campers flip that equation: they start with the boat, the hatches, and the reality of how little space there is, then decide what gear earns its place. Guides who treat paddle camping as “backpacking by boat” are blunt that heavy luxuries—things like big chairs, coolers, and excess kitchen gear—need to stay on shore if you want the kayak to handle properly, and Superior Paddling emphasizes that every item is a deliberate tradeoff that affects safety and handling.
The same rule applies to power. Instead of thinking “big battery, just in case,” decide what truly needs power all day, what can live with occasional use, and what you can simply live without. Multi-day sea-kayak campers routinely make compact loads work by planning menus, clothing, and shelter around what actually gets used, then test-packing at home to see what will not fit. A sea-kayak packing guide from BattlBox urges paddlers to be ruthless about priorities. Adopt that same discipline and your all-day power will be sized to your hull instead of your wish list.

Turn Inches into Amp-Hours: Packing Tactics That Actually Work
Kayak hatches are not closets; they are odd, tapering voids with small round or oval doors. Paddlers who live out of those voids for days at a time have converged on a few tactics that translate directly to building a compact power bay.
Use many small, flexible containers
Touring kayaks often have far more total volume than a backpack, but almost none of it is in big, square shapes. Writers who have measured this out estimate roughly 40 gallons of usable space in a typical touring boat, yet the only way to exploit it is to break your gear into many smaller pieces instead of a few big ones. Kayak camping veterans therefore rely on multiple small dry bags and stuff sacks—usually in about the 1.5–4 gallon range—because they slide into the curved bow and stern, fill gaps between larger items, and let you control trim.
For a power-focused setup, treat your energy system as one of those critical dry-bag categories. Your battery, chargers, and any sensitive electronics belong in the “must stay dry” group alongside sleeping bags, spare clothing, and key safety gear that packing guides routinely double-bag and keep off the bottom of the compartment. Both Superior Paddling and BattlBox stress using several compact dry bags rather than one oversized container so you can fine-tune how weight and bulk are distributed.
If you are tempted to use a rigid plastic box for your power gear, remember that every sharp corner that makes it look tidy on land will fight you at the hatch. Flexible dry bags or padded sleeves let you shape the power “brick” around hull curves and other gear, and they compress as you load, which is exactly what lets experienced paddlers achieve that small daily miracle of getting the hatch to close every time.
Tame the black hole with tethers and trains
Anyone who has pushed a bag deep into a hatch knows the pain of having it slide out of reach later. Sit-on-top owners with open internal hulls report that gear will happily migrate the full length of the boat if you let it, especially when there are only small access hatches. To fight that, some paddlers use soft baskets, duffels, and especially tether lines so dry bags can be clipped in and pulled out in sequence like a train, instead of disappearing into the dark.
Apply that same thinking to your power system. Clip or tie the power bag to a short retrieval line fixed near the hatch opening, and clip neighboring bags to the same line. The goal is simple: if you need to troubleshoot a connection at lunch, you should be able to pull the whole train forward without climbing your arm into the hull. This approach keeps the weight where you put it and also makes it far less likely you will yank on wires or connectors while fishing around blindly.
Paddlers who want more structure sometimes consider gluing rigid organizers to the inside of the hull. Discussions among sit-on-top owners show that softer, reversible solutions—duffels, tethers, and even partially inflated float bags to take up unused space—are favored over epoxy and hard plastic brackets, because adhesives may not bond well to the hull material and can concentrate stress in ways designers never intended.
Keep weight low and close to the cockpit
From a handling perspective, your power kit behaves like any other dense gear: where you place it strongly affects how the kayak behaves in wind and waves. Multiple packing resources advise putting the heaviest items low in the boat, centered along the keel and as close to the paddler as possible, while lighter, bulkier items migrate toward the ends. When too much weight lands in the bow, kayaks can start to veer and bury their noses in waves; when the stern is overloaded, the boat may wander and lose tracking, making it tiring to hold a line.
Guides who teach kayak camping emphasize neutral trim and balanced side-to-side loading so the boat sits at its designed waterline and responds predictably. BattlBox, for example, recommends keeping heavy items such as water and dense food in the middle of the boat rather than stuffed into the far ends. If your power kit is one of the densest things on board, it should live in that same central band, not buried in a distant bow tip.
Think about how heavy a fully loaded boat really is. Coaches who run trips near Bellingham point out that dragging a packed kayak across wet sand feels like moving roughly a 100-pound load, which is why they tell paddlers to position the boat close to the water and use tides to their advantage when loading. Moondance Kayak underscores the value of timing packing around the tide line so you do not have to muscle that weight farther than necessary. Add a dense power core to that, and careful placement becomes even more important if you want the hull to remain lively instead of sluggish.
Here is a simple way to think about placements once your power bag is built:
Item type |
Best location relative to cockpit |
Why it belongs there |
Power kit (battery, etc.) |
Low, just ahead or behind your seat |
Maximizes stability and keeps wiring runs short |
Water and dense food |
Same zone as power kit |
Helps keep trim neutral and the boat responsive |
Bulky but light sleep gear |
Deeper into bow and stern |
Fills volume without adding much swing weight |
Spare clothes and soft extras |
Higher in hatch, near deck |
Less affected by small leaks and easy to access |
Smart Mods That Turn a Stock Kayak into a Power Platform
Once your packing strategy is dialed, the final gains come from thoughtful tweaks that support all-day power without clutter or risk.
Retrofitting or upgrading hatches can be one of the highest-impact changes. If your kayak has internal volume but no practical access, installing a well-sealed hatch over a flat deck panel opens up prime real estate for a protected power bay while preserving buoyancy. The same hatch guides that stress carefully measuring and choosing a flat area near the ends also note that many paddlers add extra straps or buckles over hatch covers to reinforce the seal and keep gear reliably dry in rough water. Brooklyn Kayak Company points out that secure hatch covers are as important as the compartments below them. For a power build, those secondary straps are cheap insurance for the electronics hidden below.

Inside the cockpit, think less about raw storage volume and more about how your hands actually move when you paddle, fish, or take photos. Kayak-angling instructors describe the cockpit as your “office” where only high-frequency tools live, while the hatch and crate carry things you use less often. They typically keep pliers, fish grips, a radio, and a waterproofed cell phone at their sides, while line, leader, and extra lures ride in a crate behind the seat and rarely touched items—like spare clothes or extra batteries—move to the forward hatch. An organizing guide for fishing kayaks recommends simple, uncluttered layouts that keep high-use items close at hand.
Accessory makers take the same approach but add purpose-built storage. One detailed storage guide divides gear into three tiers: what you need in a hurry right beside the seat, what you are happy to reach for in a crate or seat bag, and what you almost never access while paddling, which belongs in the front hatch. BerleyPro’s setup advice highlights that rarely accessed items such as spare clothes and batteries naturally belong in that forward compartment in a truly waterproof bag. Let your power system follow that logic: controls and displays in your office, the compact battery module in the midships hatch, and only true spares buried deeper.
However you configure things, remember that the hull’s sealed chambers are part of your safety system. NOLS, which runs long coastal sea-kayaking courses, teaches beginners that bulkheads and hatches create critical flotation chambers, that kayaks are low and hard to see, and that self-rescue and signaling gear must stay both accessible and functional if something goes wrong. Their guidance on sea kayaks emphasizes the dual role of storage space and flotation chambers in keeping you safe. Any power mod that cuts into those chambers or makes it harder to reach pumps, paddles, lights, or radios is a bad trade, no matter how enticing the extra watt-hours look on paper.

FAQ: Common Power-Into-Hatch Questions
Q: Can you glue a hard battery box inside the hull? A: You can, but paddlers who have experimented with rigid internal organizers on plastic kayaks warn that adhesives may not bond well long term and can create stress points if the hull flexes. Soft solutions—tethered dry bags, duffels, and float bags—tend to be more forgiving, easier to reconfigure, and safer for the boat.
Q: Where should power gear go if the kayak has only one hatch? A: If there is a single hatch, treat the space just ahead or behind the cockpit as prime real estate for your power bag and other heavy items, then nest lighter, bulkier gear toward the ends and build a simple retrieval system so nothing vanishes into the bow or stern. As long as you keep the heaviest items low and central, the boat will behave more like a stock hull even with the extra load.
Q: How do you protect power gear from leaks? A: Treat your power kit exactly like a sleeping bag on a cold-weather trip: it gets a quality dry bag, often with a secondary liner or smaller waterproof pouches inside, and it rides higher in the compartment rather than sitting in the low spots where any leaked water tends to pool. That layered, belt-and-suspenders approach is standard for critical gear on serious kayak trips and works just as well for electronics.
A tight hatch does not have to limit your ambitions. If you borrow the hard-earned packing habits of coastal campers, respect what your bulkheads and hatches are already doing for you, and make a few smart layout and hatch upgrades, you can carry all-day power without turning your sleek kayak into a sluggish barge. The result is simple: more hours of working electronics on the water, with a boat that still paddles the way it is meant to.


Leave a comment
This site is protected by hCaptcha and the hCaptcha Privacy Policy and Terms of Service apply.